HTTP Foundation
Most applications which are based on Flow are web applications. As the HTTP protocol is the foundation of the World Wide Web, it also plays an important role in the architecture of the Flow framework.
This chapter describes the mechanics behind Flow’s request-response model, how it relates to the Model View Controller framework and which API functions you can use to deal with specific aspects of the HTTP request and response.
The HTTP 1.1 Specification
Although most people using or even developing for the web are aware of the fact that the Hypertext Transfer Protocol is responsible for carrying data around, considerably few of them have truly concerned themselves with the HTTP 1.1 specification.
The specification, RFC 2616, has been published in 1999 already but it is relevant today more than ever. If you’ve never fully read it, we recommend that you do so. Although it is a long read, it is important to understand the intentions and rules of the protocol before you can send cache headers or response codes in good conscience, or even claim that you developed a true REST service.
Application Flow
The basic walk through a Flow-based web application is as follows:
the browser sends an HTTP request to a webserver
the webserver calls Web/index.php and passes control over to Flow
the Bootstrap initializes the bare minimum and passes control to a suitable request handler
by default, the HTTP Request Handler takes over and runs a boot sequence which initializes all important parts of Flow
the HTTP Request Handler builds an PSR-7 HTTP Request and Response object. The Request object contains all important properties of the real HTTP request. The Response object in turn is empty and will be filled with information by a controller at a later point Both are stored in the so-called ComponentContext, which you need to use to access and/or replace any of the two.
the HTTP Request Handler initializes the HTTP Component Chain, a set of independent units that have access to the current HTTP request and response and can share information amongst each other. The chain is fully configurable, but by default it consists of the following steps:
the
trusted proxiescomponent verifies headers that override request information, like the host, port or client IP address to come from a server (reverse proxy) who’s IP address is safe-listed in the settings.the
session cookiecomponent, which restores the session from a cookie and later sets the session cookie in the response.the
routingcomponent invokes the Router to determine which controller and action is responsible for processing the request. This information (controller name, action name, arguments) is stored in theComponentContextthe
dispatchingcomponent tries to invoke the corresponding controller action via the Dispatcherthe controller, usually an Action Controller, processes the request and modifies the given HTTP Response object which will, in the end, contain the content to display (body) as well as any headers to be passed back to the client
the
standardsCompliancecomponent tries to make the HTTP Response standards compliant by adding required HTTP headers and setting the correct status code (if not already the case)Finally the RequestHandler sends the HTTP Response back to the browser
In practice, there are a few more intermediate steps being carried out, but in essence, this is the path a request is taking.
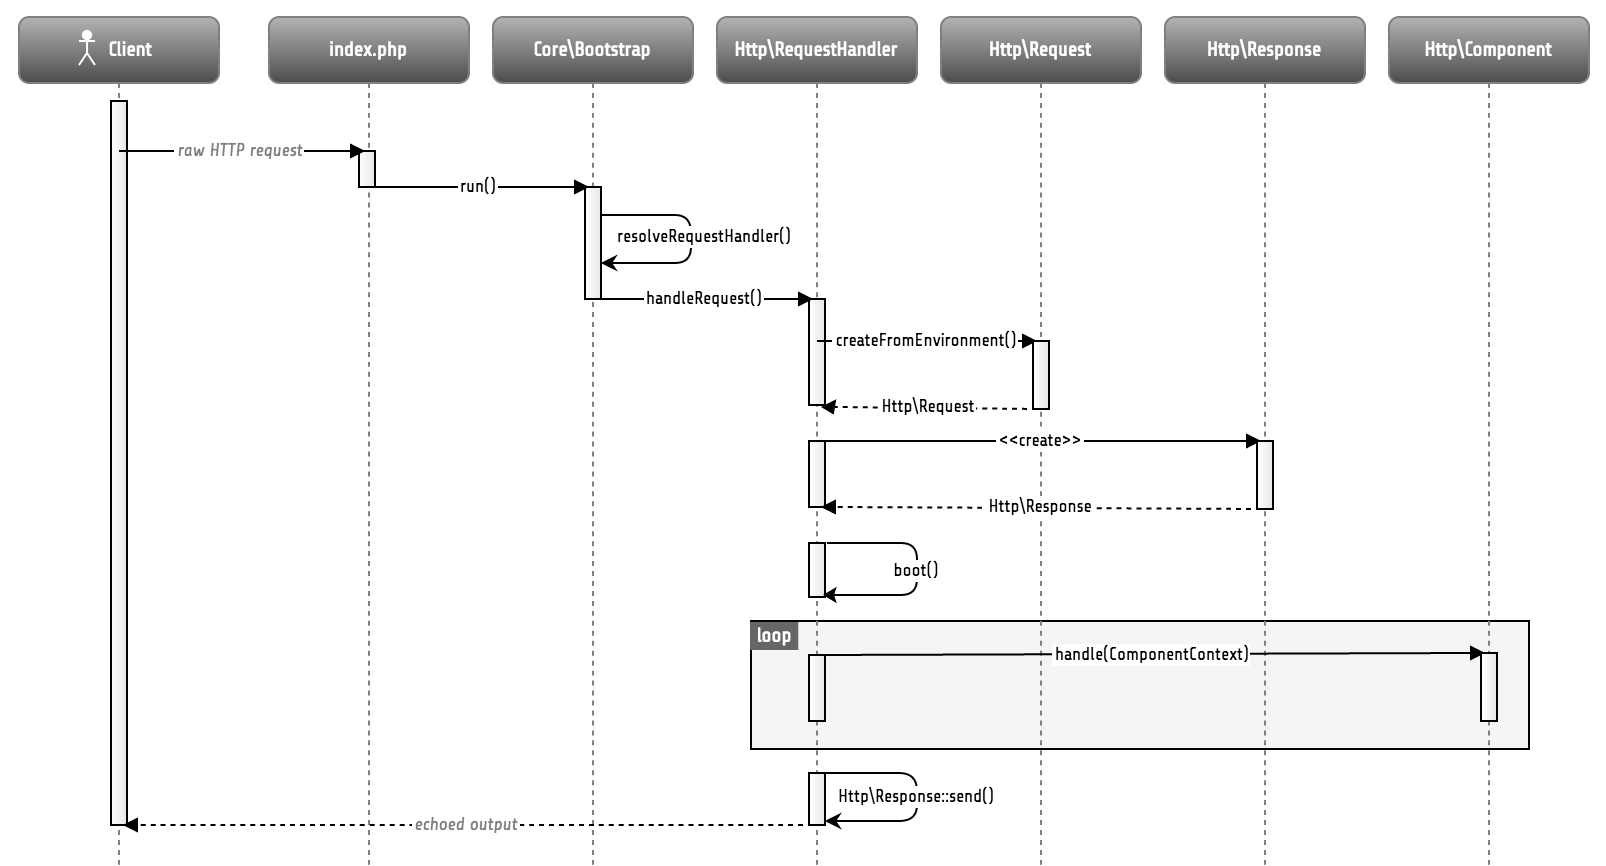
Simplified application flow
The Response is modified within the HTTP Component Chain, visualized by the highlighted “loop” block above. The component chain is configurable. If no components were registered every request would result in a blank HTTP Response. The component chain is a component too, so chains can be nested. By default the base component chain is divided into three sub chains “preprocess”, “process” and “postprocess”. The “preprocess” chain is empty by default, the “process” chain contains components for “routing” and “dispatching” and the “postprocess” chain contains a “standardsCompliance” component:
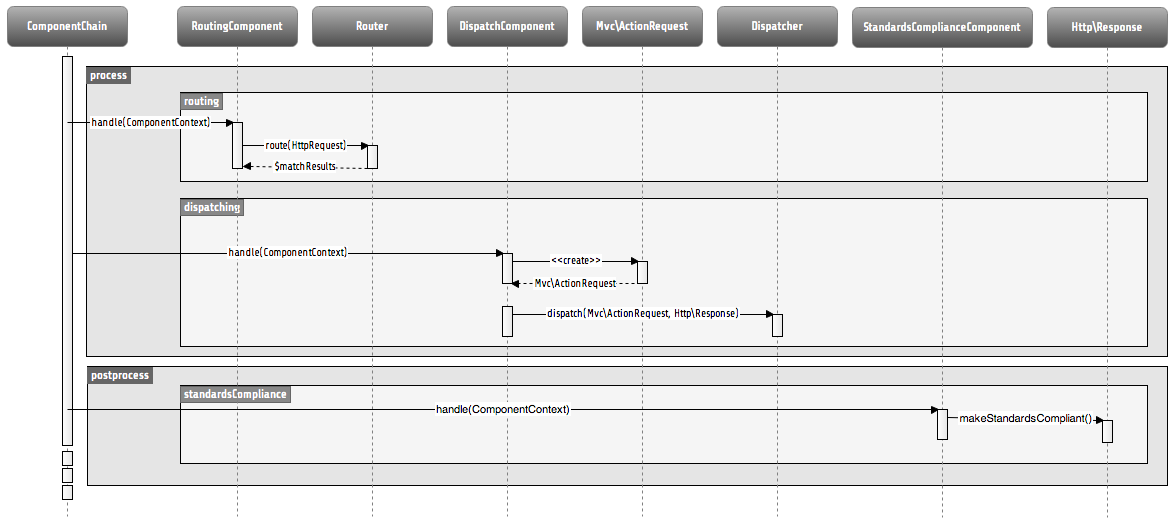
Default HTTP Component Chain
The next sections shed some light on the most important actors of this application flow.
Request Handler
The request handler is responsible for taking a request and responding in a manner the client understands. The default
HTTP Request Handler invokes the Bootstrap runtime sequence and initializes the HTTP Component chain. Other
request handlers may choose a completely different way to handle requests.
Although Flow also supports other types of requests (most notably, from the command line interface), this chapter
only deals with HTTP requests.
Flow comes with a very slim bootstrap, which results in few code being executed before control is handed over to the request handler. This pays off in situations where a specialized request handler is supposed to handle specific requests in a very effective way. In fact, the request handler is responsible for executing big parts of the initialization procedures and thus can optimize the boot process by choosing only the parts it actually needs.
A request handler must implement the RequestHandler interface interface which, among others, contains the following methods:
public function handleRequest();

public function canHandleRequest();

public function getPriority();
On trying to find a suitable request handler, the bootstrap asks each registered request handler if it can handle the
current request using canHandleRequest() – and if it can, how eager it is to do so through getPriority().
Request handlers responding with a high number as their priority, are preferred over request handlers reporting a lower
priority. Once the bootstrap has identified a matching request handler, it passes control to it by calling its
handleRequest() method.
Request handlers must first be registered in order to be considered during the resolving phase. Registration is done in
the Package class of the package containing the request handler:
class Package extends BasePackage {

        public function boot(\Neos\Flow\Core\Bootstrap $bootstrap) {
                $bootstrap->registerRequestHandler(new \Acme\Foo\BarRequestHandler($bootstrap));
        }

}
Component Chain
Instead of registering a new RequestHandler the application workflow can also be altered by a custom HTTP Component.
A HTTP component must implement the Component interface
that defines the handle() method:
  use Neos\Flow\Http\Component\ComponentInterface;
  use Neos\Flow\Http\Component\ComponentContext;

  /**
   * A sample HTTP component that intercepts the default handling and returns "bar" if the request contains an argument "foo"
   */
  class SomeHttpComponent implements ComponentInterface {

          /**
           * @var array
           */
          protected $options;

          /**
           * @param array $options
           */
          public function __construct(array $options = array()) {
                  $this->options = $options;
          }

          /**
           * @param ComponentContext $componentContext
           * @return void
           */
          public function handle(ComponentContext $componentContext) {
                  $httpRequest = $componentContext->getHttpRequest();
                  if (!$httpRequest->hasArgument('foo')) {
                          return;
                  }
                  $httpResponse = $componentContext->getHttpResponse();
$modifiedResponse = $httpResponse->withContent('bar');
                  $componentContext->replaceHttpResponse($modifiedResponse);
          }
  }
The ComponentContext contains a reference to the current HTTP request and response, besides it can be used to
pass arbitrary parameters to successive components.
To activate a component, it must be configured in the Settings.yaml:
Neos:
  Flow:
    http:
      chain:
        'process':
          chain:
            'custom':
              position: 'before routing'
              component: 'Some\Package\Http\SomeHttpComponent'
              componentOptions:
                'someOption': 'someValue'
With the position directive the order of a component within the chain can be defined. In this case the new component
will be handled before the routing component that is configured in the Neos.Flow package.
componentOptions is an optional key/value array with options that will be passed to the component’s constructor.
Interrupting the chain
Sometimes it is necessary to stop processing of a chain in order to prevent successive components to be executed.
For example if one wants to handle an AJAX request and prevent the default dispatching. This can be done by setting the
cancel parameter of the ComponentChain:
/**
 * @param ComponentContext $componentContext
 * @return void
 */
public function handle(ComponentContext $componentContext) {
        // check if the request should be handled and return otherwise

        $componentContext->setParameter(\Neos\Flow\Http\Component\ComponentChain::class, 'cancel', TRUE);
}
Note that component chains can be nested. By default the three sub chains preprocess, process and postprocess
are configured. Setting the cancel parameter only affects the currently processed chain.
With the examples from above the new component is added to the process chain. This way the postprocess chain is
still handled even if the new component cancels the current chain.
Request
The Neos\Flow\Http\Request class is, like most other classes in the Http sub package, a relatively close match
of a request according to the HTTP 1.1 specification. You’ll be best off studying the API of the class and reading the
respective comments for getting an idea about the available functions. That being said, we’ll pick a few important
methods which may need some further explanation.
Constructing a Request
You can, in theory, create a new Request instance by simply using the new operator and passing the required
arguments to the constructor. However, there are two static factory methods which make life much easier. We recommend
using these instead of the low-level constructor method.
Warning
You should only create a
Requestmanually if you want to send out requests or if you know exactly what you are doing. The createdRequestwill not have anyHTTP Componentsaffect him and might therefore lead to unexpected results, like the trusted proxy headersX-Forwarded-*not being applied and theRequestproviding wrong protocol, host or client IP address. If you need access to the current HTTPRequestorResponse, instead inject theBootstrapand get theHttpRequestandHttpResponsethrough thegetActiveRequestHandler().
Note though that those two objects are immutable, so if you need to change them, you need to in turn tell the current
ComponentContext that they need to be replaced through the ->replaceHttpRequest(..) and ->replaceHttpResponse(..)
methods respectively. You can get the current ComponentContext from the active RequestHandler.
create()
The method create() accepts an URI, the request method, arguments and a few more parameters and returns a new
Request instance with sensible default properties set. This method is best used if you need to create a new
Request object from scratch without taking any real HTTP request into account.
createFromEnvironment()
The second method, createFromEnvironment(), take the environment provided by PHP’s superglobals and specialized
functions into account. It creates a Request instance which reflects the current HTTP request received from the web
server. This method is best used if you need a Request object with all properties set according to the current
server environment and incoming HTTP request.
Note though, that you should not expect this Request to match the current Request, since the latter will still
have been affected by some HTTP Components. If you need the current Request, get it from the RequestHandler instead.
Creating an ActionRequest
In order to dispatch a request to a controller, you need an ActionRequest.
Such a request is always bound to an Http\Request:
use Neos\Flow\Core\Bootstrap;
use Neos\Flow\Http\HttpRequestHandlerInterface;
use Neos\Flow\Mvc\ActionRequest;

// ...

/**
 * @var Bootstrap
 * @Flow\Inject
 */
protected $bootstrap;

// ...

$requestHandler = $this->bootstrap->getActiveRequestHandler();
if ($requestHandler instanceof HttpRequestHandlerInterface) {
    $actionRequest = new ActionRequest($requestHandler->getHttpRequest());
    // ...
}
Arguments
The request features a few methods for retrieving and setting arguments. These arguments are the result of merging any GET, POST and PUT arguments and even the information about uploaded files. Be aware that these arguments have not been sanitized or further processed and thus are not suitable for being used in controller actions. If you, however, need to access the raw data, these API function are the right way to retrieve them.
Arguments provided by POST or PUT requests are usually encoded in one or the other way. Flow detects the encoding
through the Content-Type header and decodes the arguments and their values automatically.
getContent()
You can access the request body easily by calling the getContent() method. For performance reasons you may also
retrieve the content as a stream instead of a string. Please be aware though that, due to how input streams work in PHP,
it is not possible to retrieve the content as a stream a second time.
Media Types
The best way to determine the media types mentioned in the Accept header of a request is to call the
\Neos\Flow\Http\Helper\MediaTypeHelper::determineAcceptedMediaTypes() method.
There is also a method implementing content negotiation in a convenient way: just pass a list of supported
formats to \Neos\Flow\Http\Helper\MediaTypeHelper::negotiateMediaType() and in return you’ll get the
media type best fitting according to the preferences of the client:
$preferredType = \Neos\Flow\Http\Helper\MediaTypeHelper::negotiateMediaType(
        \Neos\Flow\Http\Helper\MediaTypeHelper::determineAcceptedMediaTypes($request),
        array('application/json', 'text/html') // These are the accepted media types
);
Request Methods
Flow supports all valid request methods, namely CONNECT, DELETE, GET, HEAD, OPTIONS, PATCH,
POST, PUT and TRACE.
Due to limited browser support and restrictive firewalls one sometimes need to tunnel request methods:
By sending a POST request and specifying the __method argument, the request method can be overridden:
<form method="POST">
        <input type="hidden" name="__method" value="DELETE" />
</form>
Additionally Flow respects the X-HTTP-Method respectively X-HTTP-Method-Override header.
Trusted Proxies
If your server is behind a reverse proxy or a CDN, some of the request information like the the host name, the port, the protocol and the original client IP address are provided via additional request headers. Since those headers can also easily be sent by an adversary, possibly bypassing security measurements, you should make sure that those headers are only accepted from trusted proxies.
For this, you can configure a list of proxy IP address ranges in CIDR notation that are allowed to provide such headers, and which headers specifically are accepted for overriding those request information:
Neos:
  Flow:
    http:
      trustedProxies:
        proxies:
          - '216.246.40.0/24'
          - '216.246.100.0/24'

        headers:
          clientIp: 'X-Forwarded-For'
          host: 'X-Forwarded-Host'
          port: 'X-Forwarded-Port'
          proto: 'X-Forwarded-Proto'
This would mean that only the X-Forwarded-* headers are accepted and only as long as those come from one of the
IP ranges 216.246.40.0-255 or 216.246.100.0-255. If you are using the standardized Forwarded Header, you
can also simply set trustedProxies.headers to 'Forwarded', which is the same as setting all four properties to
this value.
By default, no proxies are trusted (unless the environment variable FLOW_HTTP_TRUSTED_PROXIES is set) and only the
direct request informations will be used.
If you specify trusted proxy addresses, by default only the X-Forwarded-* headers are accepted.
Note
On some container environments like ddev, the container acts as a proxy to provide port mapping and hence needs
to be allowed in this setting. Otherwise the URLs generated will likely not work and end up with something along
the lines of ‘https://flow.ddev.local:80’. Therefore you probably need to set Neos.Flow.http.trustedProxies.proxies
setting to ‘*’ in your Development environment Settings.yaml.
You can also specify the list of IP addresses or address ranges in comma separated format, which is useful for using in the
environment variable FLOW_HTTP_TRUSTED_PROXIES:
Neos:
  Flow:
    http:
      trustedProxies:
        proxies: '216.246.40.0/24,216.246.100.0/24'
Also, for backwards compatibility the following headers are trusted for providing the client IP address:
Client-Ip, X-Forwarded-For, X-Forwarded, X-Cluster-Client-Ip, Forwarded-For, Forwarded
Those headers will be checked from left to right and the first set header will be used for determining the client address.
Response
Being the counterpart to the request, the Response class represents the HTTP response. Its most important function
is to contain the response body and the response status. Again, it is recommended to take a closer look at the actual
class before you start using the API in earnest.
The Response class features a few specialities, we’d like to mention at this point:
Dates
The dates passed to one of the date-related methods must either be a RFC 2822 parsable date string or a PHP DateTime
object. Please note that all methods returning a date will do so in form of a DateTime object.
According to RFC 2616 all dates must be given in Coordinated Universal Time, also known as UTC. UTC is also
sometimes referred to as GMT, but in fact Greenwich Mean Time is not the correct time standard to use. Just to
complicate things a bit more, according to the standards the HTTP headers will contain dates with the timezone declared
as GMT – which in reality refers to UTC.
Flow will always return dates related to HTTP as UTC times. Keep that in mind if you pass dates from a different
standard and then retrieve them again: the DateTime objects will mark the same point in time, but have a different
time zone set.
Headers
Both classes, Request and Response inherit methods from the Message class. Among them are functions for
retrieving and setting headers. If you need to deal with headers, please have a closer look at the Headers class
which not only contains setters and getters but also some specialized cookie handling and cache header support.
In general, Cache-Control directives can be set through the regular set() method. However, a more convenient way
to tweak single directives without overriding previously set values is the setCacheControlDirective() method. Here
is an example – from the context of an Action Controller – for setting the max-age directive one hour:
$headers = $this->request->getHttpRequest()->getHeaders();
$headers->setCacheControlDirective('max-age', 3600);
Uri
The Http sub package also provides a class representing a Unified Resource Identifier, better known as URI.
The difference between a URI and a URL is not as complicated as you might think. “URI” is more generic, so URLs are URIs
but not the other way around. A URI identifies a resource by its name or location.
But it does not have to specify the representation of that resource – URLs do that.
Consider the following examples:
A URI specifying a resource:
A URL specifying two different representations of that resource:
Throughout the framework we use the term URI instead of URL because it is more generic and more often than not,
the correct term to use.
All methods in Flow returning a URI will do so in form of a URI object. Most methods requiring a URI will also accept a string representation.
You are encouraged to use the Uri class for your own purposes – you’ll get a nice API and validation for free!
Virtual Browser
The HTTP foundation comes with a virtual browser which allows for sending and receiving HTTP requests and responses.
The browser’s API basically follows the functions of a typical web browser. The requests and responses are used in form
of Http\Request and Http\Response instances, similar to the requests and responses used by Flow’s request
handling mechanism.
Request Engines
The engine responsible for actually sending the request is pluggable. Currently there are two engines delivered with Flow:
InternalRequestEnginesimulates requests for use in functional testsCurlEngineuses the cURL extension to send real requests to other servers
Sending a request and processing the response is a matter of a few lines:
/**
 * A sample controller
 */
class MyController extends ActionController {

        /**
         * @Flow\Inject
         * @var \Neos\Flow\Http\Client\Browser
         */
        protected $browser;

        /**
         * @Flow\Inject
         * @var \Neos\Flow\Http\Client\CurlEngine
         */
        protected $browserRequestEngine;

        /**
         * Some action
         */
        public function testAction() {
                $this->browser->setRequestEngine($this->browserRequestEngine);
                $response = $this->browser->request('https://www.flowframework.io');
                return ($response->hasHeader('X-Flow-Powered') ? 'yes' : 'no');
        }
}
As there is no default engine selected for the browser, you need to set one yourself. Of course you can use the advanced Dependency Injection techniques (through Objects.yaml) for injecting an engine into the browser you use.
Also note that the virtual browser is of scope Prototype in order to support multiple browsers with possibly different request engines.
Automatic Headers
The virtual browser allows for automatically sending specified headers along with every request. Simply pass the header to the browser as follows:
$browser->addAutomaticRequestHeader('Accept-Language', 'lv');
You can remove automatic headers likewise:
$browser->removeAutomaticRequestHeader('Accept-Language');
Functional Testing
The base test case for functional test cases already provides a browser which you can use for testing controllers and
other application parts which are accessible via HTTP. This browser has the InternalRequestEngine set by default:
/**
 * Some functional tests
 */
class SomeTest extends \Neos\Flow\Tests\FunctionalTestCase {

        /**
         * @var boolean
         */
        protected $testableHttpEnabled = TRUE;

        /**
         * Send a request to a controller of my application.
         * Hint: The host name is not evaluated by Flow and thus doesn't matter
         *
         * @test
         */
        public function someTest() {
                $response = $this->browser->request('http://localhost/Acme.Demo/Foo/bar.html');
                $this->assertContains('it works', $response->getContent());
        }

}