Installation
Flow Download
Flow uses Composer for dependency management, which is a separate command line tool. Install it by following the installation instructions which boil down to this in the simplest case:
curl -s https://getcomposer.org/installer | php
Note
Feel free to install the composer command to a global location, by moving
the phar archive to e.g. /usr/local/bin/composer and making it executable.
The following documentation assumes composer is installed globally.
Then use Composer in a directory which will be accessible by your web server to download and install all packages of the Flow Base Distribution. The following command will clone the latest stable version, include development dependencies and keep git metadata for future use:
composer create-project --keep-vcs neos/flow-base-distribution tutorial
This will install the latest stable version of Neos. In order to install a specific version, type:
composer create-project --keep-vcs neos/flow-base-distribution <target-directory> <version>
And replace <target-directory> with the folder name to create the project in and <version> with the specific version to install, for example 1.2. See [Composer documentation](https://getcomposer.org/doc/03-cli.md#create-project) for further details.
Note
Throughout this tutorial we assume that you installed the Flow distribution in /var/apache2/htdocs/tutorial and that /var/apache2/htdocs is the document root of your web server. On a Windows machine you might use c:\xampp\htdocs instead.
To update all dependencies, run this from the top-level folder of the distribution:
composer update
Directory Structure
Let’s take a look at the directory structure of a Flow application:
Directory |
Description |
|---|---|
Configuration/ |
Application specific configuration, grouped by contexts |
Data/ |
Persistent and temporary data, including caches, logs, resources and the database |
Packages/ |
Contains sub directories which in turn contain package directories |
Packages/Framework/ |
Packages which are part of the official Flow distribution |
Packages/Application/ |
Application specific packages |
Packages/Libraries/ |
3rd party libraries |
Web/ |
Public web root |
A Flow application usually consists of the above directories. As you see, most of them contain data which is specific to your application, therefore upgrading the Flow distribution is a matter of updating Packages/Framework/ and Packages/Libraries/ when a new release is available.
Flow is a package based system which means that all code, documentation and other resources are bundled in packages. Each package has its own directory with a defined sub structure. Your own PHP code and resources will usually end up in a package residing below Packages/Application/.
Basic Settings
In order to be able to run and serve out pages, Flow requires very few configurations.
Flow uses so called YAML files for all it’s configuration. If you don’t know that yet,
just take a look at the example, it is really easy to understand!
For starters, you should begin by renaming the file Configuration/Settings.yaml.example
to Configuration/Settings.yaml. This will be referenced elsewhere as the global
settings file, because it lives in the installation directory, instead of a single
package. It only contains the most basic configuration for a mysql database running
on the same machine and a setting to enable the default Flow [routes](https://en.wikipedia.org/wiki/Web_framework#URL_mapping), which you need
to see the “Welcome” page later.
Neos:
  Flow:
    persistence:
      backendOptions:
        driver: 'pdo_mysql'  # use pdo_pgsql for PostgreSQL
        charset: 'utf8mb4'   # change to utf8 when using PostgreSQL
        host: '127.0.0.1'    # adjust to your database host

    mvc:
      routes:
        'Neos.Flow': true
Also, if you are trying this on Windows by chance, you need to uncomment the lines
about the phpBinaryPathAndFilename and adjust the path to the php.exe.
If you installed e.g. XAMPP, this should be C:\path\to\xampp\php\php.exe.
Other, more specific options should mostly only go directly into package specific
Settings.yaml files. You will learn about those later.
File Permissions
Most of the directories and files must be readable and writable for the user
you’re running Flow with. This user will usually be the same one running your
web server (httpd, www, _www or www-data on most Unix based systems). However it
can and usually will happen that Flow is launched from the command line by a
different user. Therefore it is important that both, the web server user and
the command line user are members of a common group and the file permissions
are set accordingly.
We recommend setting ownership of directories and files to the web server’s group. All users who also need to launch Flow must also be added this group. But don’t worry, this is simply done by changing to the Flow base directory and calling the following command (this command must be called as super user):
sudo ./flow core:setfilepermissions john www-data www-data
Note
Setting file permissions is not necessary and not possible on Windows machines.
For Apache to be able to create symlinks, you need to use Windows Vista (or
newer) and Apache needs to be started with Administrator privileges. Alternatively
you can run the command flow flow:cache:warmup once from an Administrator
elevated command line inside your installation folder. You then also need to
repeat this step, whenever you install new packages.
Now that the file permissions are set, all users who plan using Flow from the command line need to join the web server’s group. On a Linux machine this can be done by typing:
sudo usermod -a -G www-data john
On a Mac you can add a user to the web group with the following command:
sudo dscl . -append /Groups/_www GroupMembership johndoe
You will have to exit your shell / terminal window and open it again for the new group membership to take effect.
Note
In this example the web user was _www and the web group
is called _www as well (that’s the case on a Mac using
MacPorts ). On your system the user or group
might be www-data, httpd or the like - make sure to find out and
specify the correct user and group for your environment.
Web Server Configuration
As you have seen previously, Flow uses a directory called Web as the public web root. We highly recommend that you create a virtual host which points to this directory and thereby assure that all other directories are not accessible from the web. For testing purposes on your local machine it is okay (but not very convenient) to do without a virtual host, but don’t try that on a public server!
Configure AllowOverride and MultiViews
Because Flow provides an .htaccess file with mod_rewrite rules in it,
you need to make sure that the directory grants the neccessary rights:
httpd.conf:
<Directory /var/apache2/htdocs/tutorial/>
        AllowOverride FileInfo Options=MultiViews
</Directory>
The way Flow addresses resources on the web makes it incompatible with the MultiViews
feature of Apache. This needs to be turned off, the default .htaccess file distributed
with Flow contains this code already
<IfModule mod_negotiation.c>

        # prevents Apache's automatic file negotiation, it breaks resource URLs
        Options -MultiViews

</IfModule>
Configure server-side scripts
Important: Disallow execution of server-side scripts below Web/_Resources. If users can upload (PHP) scripts they can otherwise be executed on the server. This should almost never be allowed, so make sure to disable PHP (or other script handlers) for anything below Web/_Resources.
The .htaccess file placed into the Web/_Resources folder does this for Apache when .htaccess is evaluated. Another way is to use this in the configuration:
<Directory /var/apache2/htdocs/tutorial/Web/_Resources>
        AllowOverride None
        SetHandler default-handler
        php_flag engine off
</Directory>
For nginx and other servers use similar configuration.
Configure a Context
As you’ll learn soon, Flow can be launched in different contexts, the most
popular being Production, Development and Testing. Although there
are various ways to choose the current context, the most convenient is to setup
a dedicated virtual host defining an environment variable.
Setting Up a Virtual Host for Context «Development»
Assuming that you chose Apache 2 as your web server, simply create a new virtual
host by adding the following directions to your Apache configuration
(conf/extra/httpd-vhosts.conf on many systems; make sure it is actually
loaded with Include in httpd.conf):
httpd.conf:
<VirtualHost *:80>
        DocumentRoot /var/apache2/htdocs/tutorial/Web/
        ServerName dev.tutorial.local
</VirtualHost>
This virtual host will later be accessible via the URL http://dev.tutorial.local.
Note
Flow runs per default in the Development context. That’s why the ServerName
in this example is dev.tutorial.local.
Setting Up a Virtual Host for Context «Production»
httpd.conf:
<VirtualHost *:80>
        DocumentRoot /var/apache2/htdocs/tutorial/Web/
        ServerName tutorial.local
        SetEnv FLOW_CONTEXT Production
</VirtualHost>
You’ll be able to access the same application running in Production
context by accessing the URL http://tutorial.local. What’s left is telling
your operating system that the invented domain names can be found on your local
machine. Add the following line to your /etc/hosts file
(C:windowssystem32driversetchosts on Windows):
hosts:
127.0.0.1 tutorial.local dev.tutorial.local
Change Context to «Production» without Virtual Host
If you decided to skip setting up virtual hosts earlier on, you can enable the Production context by editing the .htaccess file in the Web directory and remove the comment sign in front of the SetEnv line:
.htaccess:
# You can specify a default context by activating this option:
SetEnv FLOW_CONTEXT Production
Note
The concept of contexts and their benefits is explained in the next chapter «Configuration».
Welcome to Flow
Restart Apache and test your new configuration by accessing http://dev.tutorial.local in a web browser. You should be greeted by Flow’s welcome screen:
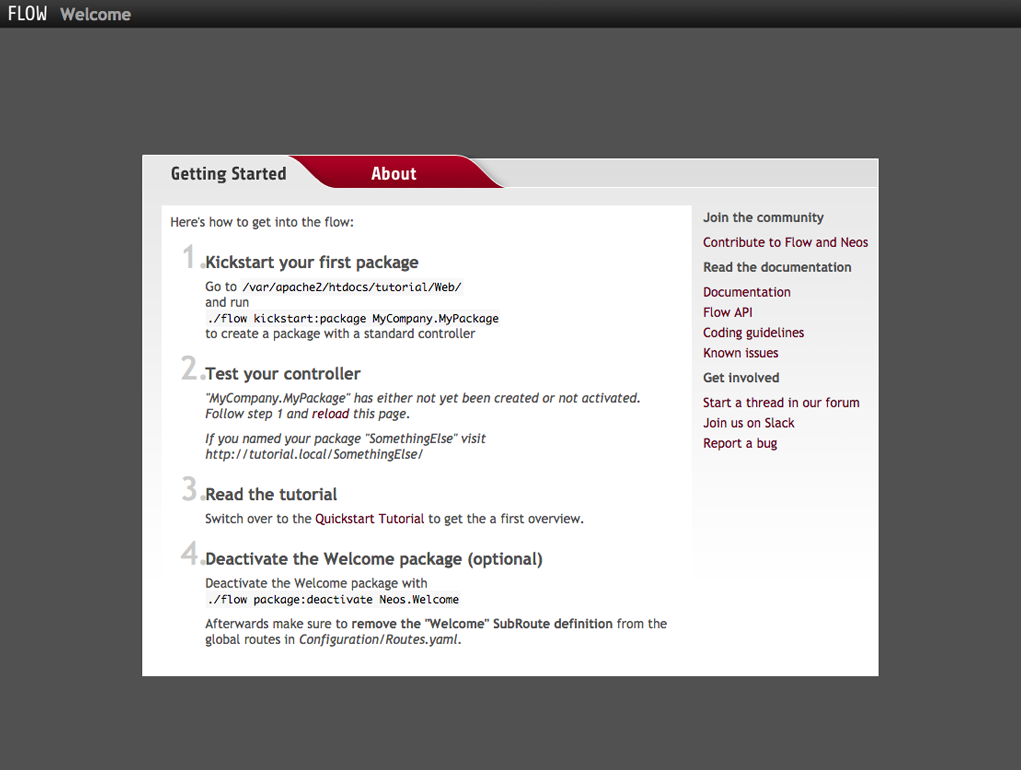
The Flow Welcome screen
Tip
If you get in trouble during the installation ask for help at discuss.neos.io.