Quickstart
What Is in This Guide?
This guided tour gets you started with Flow by giving step-by-step instructions for the development of a small sample application. It will give you a first overview of the basic concepts and leaves the details to the full manual and more specific guides.
Be warned that your head will be buzzed with several new concepts. But after you made your way through the whitewater you’ll surely ride the wave in no time!
What Is Flow?
Flow is a PHP-based application framework which is especially well-suited for enterprise-grade applications. Its architecture and conventions keep your head clear and let you focus on the essential parts of your application. Although stability, security and performance are all important elements of the framework’s design, the fluent user experience is the one underlying theme which rules them all.
As a matter of fact, Flow is easier to learn for PHP beginners than for veterans. It takes a while to leave behind old paradigms and open up for new approaches. That being said, developing with Flow is very intuitive and the basic principles can be learned within a few hours. Even if you don’t decide to use Flow for your next project, there are a lot of universal development techniques you can learn.
Tip
This tutorial goes best with a Caffè Latte or, if it’s afternoon or late night already, with a few shots of Espresso …
Installing Flow
Setting up Flow is pretty straight-forward. As a minimum requirement you will need:
A web server (we recommend Apache with the mod_rewrite module enabled)
PHP 7.2.0 or later
A database supported by Doctrine DBAL, such as MySQL
Command line access
Install Composer by following the installation instructions which boils down to this in the simplest case:
curl -s https://getcomposer.org/installer | php
Note
Feel free to install the composer command to a global location, by moving
the phar archive to e.g. /usr/local/bin/composer and making it executable.
The following documentation assumes composer is installed globally.
Tip
Running composer selfupdate from time to time keeps it up to date
and can prevent errors caused by composer not understanding e.g. new
syntax in manifest files.
Then use Composer in a directory which will be accessible by your web server to download and install all packages of the Flow Base Distribution. The following command will clone the latest version, include development dependencies and keep git metadata for future use:
composer create-project --keep-vcs neos/flow-base-distribution Quickstart
You will end up with a directory structure like this:
htdocs/               <-- depending on your web server
  Quickstart/
    Build/
    Configuration/
      Settings.yaml.example
      ...
    Packages/
      Framework/
        Neos.Flow/
        ...
    Web/              <-- your virtual host root will point to this
      .htaccess
      index.php
    flow
    flow.bat
Setting File Permissions
You will access Flow from both, the command line and the web browser. In order to provide
write access to certain directories for both, you will need to set the file permissions
accordingly. But don’t worry, this is simply done by changing to the Flow base directory
(Quickstart in the above example) and calling the following command:
command line:
./flow core:setfilepermissions john www-data www-data
Please replace john by your own username. The second argument is supposed to be the username of your web server and the last one specifies the web server’s group. For most installations on Mac OS X this would be both _www instead of www-data.
It can and usually will happen that Flow is launched from the command line by a different user. All users who plan using Flow from the command line need to join the web server’s group. On a Linux machine this can be done by typing:
command line:
sudo usermod -a -G www-data john
On a Mac you can add a user to the web group with the following command:
command line:
sudo dscl . -append /Groups/_www GroupMembership johndoe
You will have to exit your shell / terminal window and open it again for the new group membership to take effect.
Note
Setting file permissions is not necessary and not possible on Windows machines. For Apache to be able to create symlinks, you need to use Windows Vista (or newer) and Apache needs to be started with Administrator privileges.
Setting up a virtual host
It is very much recommended to create a virtual host configuration for Apache that uses the Web folder as the document root. This has a number of reasons:
it makes for nicer URLs
it is more secure because that way access to anything else through the web is not possible
The latter point is really important!
For the rest of this tutorial we assume you have created a virtual host
that can be reached through http://quickstart/.
Testing the Installation
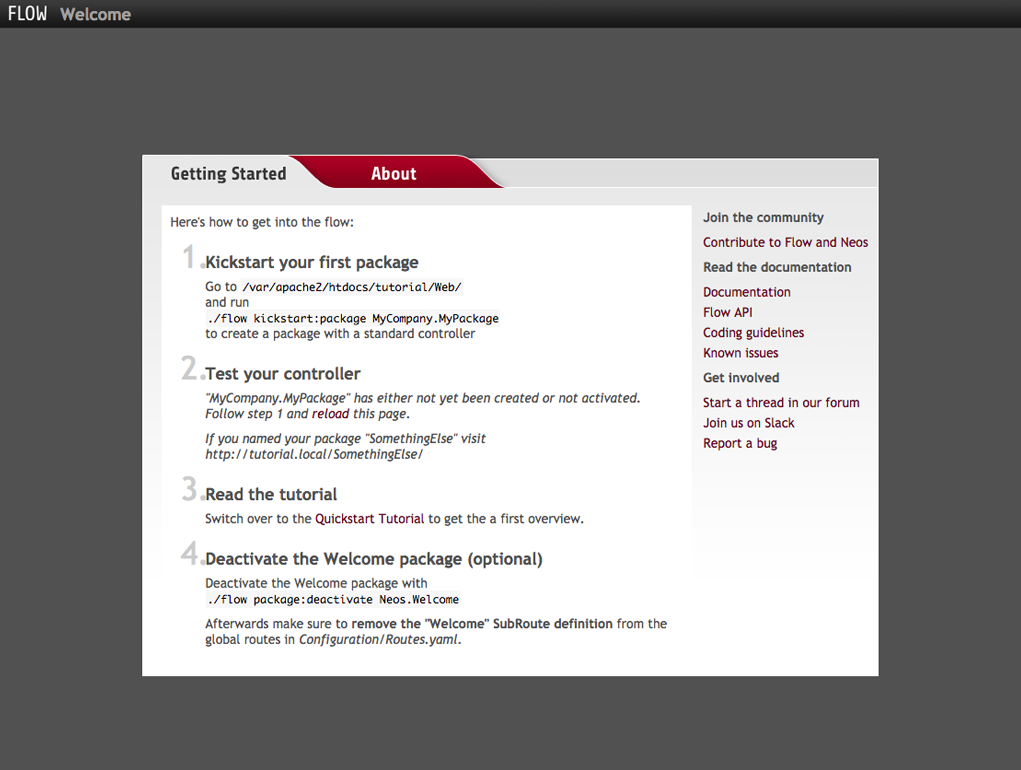
The Flow Welcome Screen
If your system is configured correctly you should now be able to access the Welcome screen:
http://quickstart/
If you did not follow our advice to create a virtual host, point your browser to the
Web directory of your Flow installation throughout this tutorial, for example:
http://localhost/Quickstart/Web/
The result should look similar to the screen you see in the screenshot. If something went wrong, it usually can be blamed on a misconfigured web server or insufficient file permissions.
Note
If all you get is a 404, you might need to edit the .htaccess file in the
Web folder to adjust the RewriteBase directive as needed.
Note
Depending on your environment (especially on Windows systems) you might need to set the
path to the PHP binary in Configuration/Settings.yaml. If you copied the provided
example Settings you only need to uncomment the corresponding lines and adjust the path.
Tip
There are some friendly ghosts in our Slack channel and in the Discuss forum – they will gladly help you out if you describe your problem as precisely as possible.
Some Note About Speed
The first request will usually take quite a while because Flow does a lot of heavy lifting in the background. It analyzes code, builds up reflection caches and applies security rules. During all the following examples you will work in the so called Development Context. It makes development very convenient but feels a lot slower than the Production Context – the one you will obviously use for the application in production.
Kickstarting a Package
The actual code of an application and its resources – such as images, style sheets and templates – are bundled into packages. Each package is identified by a globally unique package key, which consists of your company or domain name (the so called vendor name) and further parts you choose for naming the package.
Let’s create a Demo package for our fictive company Acme:
$ ./flow kickstart:package Acme.Demo
Created .../Acme.Demo/Classes/Acme/Demo/Controller/StandardController.php
Created .../Acme.Demo/Resources/Private/Layouts/Default.html
Created .../Acme.Demo/Resources/Private/Templates/Standard/Index.html
The Kickstarter will create a new package directory in Packages/Application/ resulting in the following structure:
Packages/
  Application/
    Acme.Demo/
      Classes/Acme/Demo/
      Configuration/
      Documentation/
      Meta/
      Resources/
      Tests/
The kickstart:package command also generates a sample controller which displays some content. You should be able to access it through the following URL:
http://quickstart/Acme.Demo
Tip
In case your web server lacks mod_rewrite, it could be that you need to call this to access the controller:
http://quickstart/index.php/Acme.Demo
If this the case, keep in mind to add index.php to the following URLs in this
Quickstart tutorial.
Hello World
Let’s use the StandardController for some more experiments. After opening the respective class file in Packages/Application/Acme.Demo/Classes/Acme/Demo/Controller/ you should find the method indexAction() which is responsible for the output you’ve just seen in your web browser:
public function indexAction(): void
{
    $this->view->assign('foos', ['bar', 'baz']);
}
Accepting some kind of user input is essential for most applications and Flow does a great deal of processing and sanitizing any incoming data. Try it out – create a new action method like this one:
/**
 * This action outputs a custom greeting
 *
 * @return string custom greeting
 */
public function helloAction(string $name): string
{
    return 'Hello ' . $name . '!';
}
Important
For the sake of simplicity the above example does not contain any input/output sanitation. If your controller action directly returns something, make sure to filter the data!
Tip
You should always properly document all your functions and class properties. This will not only help other developers to understand your code, but is also essential for Flow to work properly.
Now test the new action by passing it a name like in the following URL:
http://quickstart/Acme.Demo/Standard/hello?name=Robert
The path segments of this URL tell Flow to which controller and action the web request should be dispatched to. In our example the parts are:
Acme.Demo (package key)
Standard (controller name)
hello (action name)
If everything went fine, you should be greeted by a friendly “Hello Robert!” – if that’s the name you passed to the action. Also try leaving out the name parameter in the URL – Flow will complain about a missing argument.
Database Setup
One important design goal for Flow was to let a developer focus on the business logic and work in a truly object-oriented fashion. While you develop a Flow application, you will hardly note that content is actually stored in a database. Your code won’t contain any SQL query and you don’t have to deal with setting up table structures.
But before you can store anything, you still need to set up a database and tell Flow how to access it. The credentials and driver options need to be specified in the global Flow settings.
After you have created an empty database and set up a user with sufficient access rights, copy the file Configuration/Settings.yaml.example to Configuration/Settings.yaml. Open and adjust the file to your needs – for a common MySQL setup, it would look similar to this:
Neos:
  Flow:
    persistence:
      backendOptions:
        driver: 'pdo_mysql'
        dbname: 'quickstart' # adjust to your database name
        user: 'root'         # adjust to your database user
        password: 'password' # adjust to your database password
        host: '127.0.0.1'    # adjust to your database host
Note
If you are not familiar with the YAML format yet, there are two things you should know at least:
Indentation has a meaning: by different levels of indentation, a structure is defined.
Spaces, not tabs: you must indent with exactly 2 spaces per level, don’t use tabs.
If you configured everything correctly, the following command will create the initial table structure needed by Flow:
$ ./flow doctrine:migrate
Migrating up to 2011xxxxx00 from 0

++ migrating 2011xxxxx00
    -> CREATE TABLE flow_resource_resourcepointer (hash VARCHAR(255) NOT NULL, PRIMARY
    -> CREATE TABLE flow_resource_resource (persistence_object_identifier VARCHAR(40)
...
++ finished in 0.76
Storing Objects
Let’s take a shortcut here – instead of programming your own controller, model and view just generate some example with the kickstarter:
$ ./flow kickstart:actioncontroller --generate-actions --generate-related Acme.Demo CoffeeBean
Created .../Acme.Demo/Classes/Acme/Demo/Domain/Model/CoffeeBean.php
Created .../Acme.Demo/Tests/Unit/Domain/Model/CoffeeBeanTest.php
Created .../Acme.Demo/Classes/Acme/Demo/Domain/Repository/CoffeeBeanRepository.php
Created .../Acme.Demo/Classes/Acme/Demo/Controller/CoffeeBeanController.php
Omitted .../Acme.Demo/Resources/Private/Layouts/Default.html
Created .../Acme.Demo/Resources/Private/Templates/CoffeeBean/Index.html
Created .../Acme.Demo/Resources/Private/Templates/CoffeeBean/New.html
Created .../Acme.Demo/Resources/Private/Templates/CoffeeBean/Edit.html
Created .../Acme.Demo/Resources/Private/Templates/CoffeeBean/Show.html
As new models were generated, do not forget to update the database schema with the respective doctrine:* commands.
Whenever a model is created or modified, the database structure needs to be adjusted to fit the new PHP code. This is something you should do consciously because existing data could be altered or removed – therefore this step isn’t taken automatically by Flow.
The kickstarter created a new model representing a coffee bean. For promoting the new structure to the database, just run the doctrine:update command:
$ ./flow doctrine:update
Executed a database schema update.
Tip
In a real project you should avoid the doctrine:update command and instead work with migrations. See the “Persistence” section of the The Definitive Guide for more details
A quick glance at the table structure (using your preferred database management tool) will reveal that a new table for coffee beans has been created.
The controller rendered by the kickstarter provides some very basic functionality for creating, editing and deleting coffee beans. Try it out by accessing this URL:
http://quickstart/Acme.Demo/CoffeeBean
Create a few coffee beans, edit and delete them and take a look at the database tables if you can’t resist …
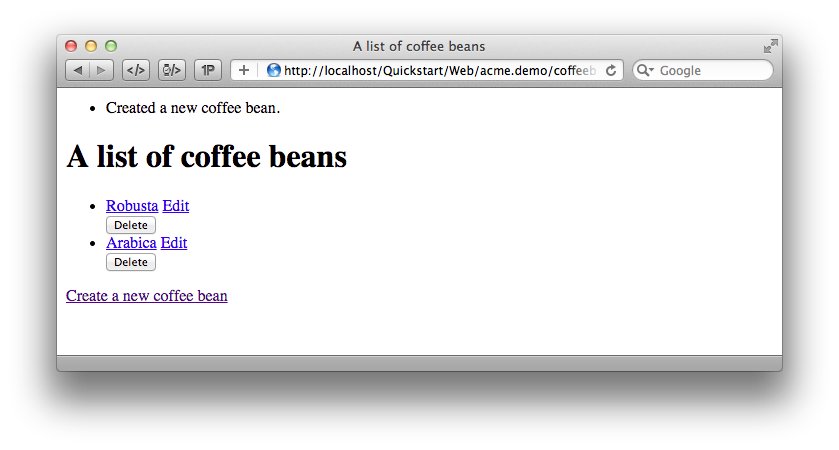
List and create coffee beans
A Closer Look at the Example
In case you have been programming PHP for a while, you might be used to tackle many
low-level tasks yourself: Rendering HTML forms, retrieving and validating input from the
superglobals $_GET, $_POST and $_FILES, validating the input, creating SQL
queries for storing the input in the database, checking for Cross-Site Scripting,
Cross-Site Request Forgery, SQL-Injection and much more.
With this background, the following complete code listing powering the previous example may seem a bit odd, if not magical to you. Take a close look at each of the methods – can you imagine what they do?
use Acme\Demo\Domain\Model\CoffeeBean;
use Acme\Demo\Domain\Repository\CoffeeBeanRepository;

class CoffeeBeanController extends ActionController
{

    /**
     * @Flow\Inject
     * @var CoffeeBeanRepository
     */
    protected $coffeeBeanRepository;

    public function indexAction(): void
    {
        $this->view->assign('coffeeBeans', $this->coffeeBeanRepository->findAll());
    }

    public function showAction(CoffeeBean $coffeeBean): void
    {
        $this->view->assign('coffeeBean', $coffeeBean);
    }

    public function newAction(): void
    {
    }

    public function createAction(CoffeeBean $newCoffeeBean): void
    {
        $this->coffeeBeanRepository->add($newCoffeeBean);
        $this->addFlashMessage('Created a new coffee bean.');
        $this->redirect('index');
    }

    public function editAction(CoffeeBean $coffeeBean): void
    {
        $this->view->assign('coffeeBean', $coffeeBean);
    }

    /**
     * @param CoffeeBean $coffeeBean
     * @return void
     */
    public function updateAction(CoffeeBean $coffeeBean) {
        $this->coffeeBeanRepository->update($coffeeBean);
        $this->addFlashMessage('Updated the coffee bean.');
        $this->redirect('index');
    }

    public function deleteAction(CoffeeBean $coffeeBean): void
    {
        $this->coffeeBeanRepository->remove($coffeeBean);
        $this->addFlashMessage('Deleted a coffee bean.');
        $this->redirect('index');
    }

}
You will learn all the nitty-gritty details of persistence (that is storing and retrieving objects in a database), Model-View Controller and validation in The Definitive Guide. With some hints for each of the actions of this controller though, you’ll get some first impression of how basic operations like creating or deleting objects are handled in Flow.
Without further ado let’s take a closer look at some of the actions:
indexAction
The indexAction displays a list of coffee beans. All it does is fetching
all existing coffee beans from a repository and then handing them over to the template
for rendering.
The CoffeeBeanRepository takes care of storing and finding stored coffee beans. The
simplest operation it provides is the findAll() method which returns a list of all
existing CoffeeBean objects.
For consistency reasons only one instance of the CoffeeBeanRepository class may
exist at a time. Otherwise there would be multiple repositories storing CoffeeBean
objects – and which one would you then ask for retrieving a specific coffee bean back from
the database? The CoffeeBeanRepository is therefore tagged with an annotation
stating that only a single instance may exist at a time:
/**
 * @Flow\Scope("singleton")
 */
class CoffeeBeanRepository extends Repository
{
Because PHP doesn’t support the concept of annotations natively, we are using doc comments which are parsed by an annotation parser in Flow.
Flow’s object management detects the Scope annotation and takes care of
all the details. All you need to do in order to get the right CoffeeBeanRepository
instance is telling Flow to inject it into a class property you defined:
/**
 * @Flow\Inject
 * @var CoffeeBeanRepository
 */
protected $coffeeBeanRepository;
The Inject annotation tells Flow to set the $coffeeBeanRepository right
after the CoffeeBeanController class has been instantiated.
Tip
This feature is called Dependency Injection and is an important feature of Flow. Although it is blindingly easy to use, you’ll want to read some more about it later in the related section of the main manual.
Flow adheres to the Model-View-Controller pattern – that’s why the actual output is not
generated by the action method itself. This task is delegated to the view, and that is,
by default, a Fluid template (Fluid is the name of the templating engine Flow uses).
Following the conventions, there should be a directory structure in the
Resources/Private/Templates/ folder of a package which corresponds to the
controllers and actions. For the index action of the CoffeeBeanController the
template Resources/Private/Templates/CoffeeBean/Index.html will be used for
rendering.
Templates can display content which has been assigned to template variables. The
placeholder {name} will be replaced by the actual value of the template variable
name once the template is rendered. Likewise {coffeeBean.name} is substituted
by the value of the coffee bean’s name attribute.
The coffee beans retrieved from the repository are assigned to the template variable
coffeeBeans. The template in turn uses a for-each loop for rendering a list of coffee
beans:
<ul>
    <f:for each="{coffeeBeans}" as="coffeeBean">
        <li>
            {coffeeBean.name}
        </li>
    </f:for>
</ul>
showAction
The showAction displays a single coffee bean:
public function showAction(CoffeeBean $coffeeBean): void
{
    $this->view->assign('coffeeBean', $coffeeBean);
}
The corresponding template for this action is stored in this file:
Acme.Demo/Resources/Private/Templates/CoffeeBean/Show.html
This template produces a simple representation of the coffeeBean object.
Similar to the indexAction the coffee bean object is assigned to a Fluid variable:
$this->view->assign('coffeeBean', $coffeeBean);
The showAction method requires a CoffeeBean object as its method argument.
But we need to look into the template of the indexAction again to understand how
coffee beans are actually passed to the showAction.
In the list of coffee beans, rendered by the indexAction, each entry links to the
corresponding showAction. The links are rendered by a so-called view helper in the
Fluid template Index.html:
<f:link.action action="show" arguments="{coffeeBean: coffeeBean}">…</f:link.action>
The interesting part is the {coffeeBean: coffeeBean} argument assignment:
It makes sure that the CoffeeBean object, stored in the coffeeBean
template variable, will be passed to the showAction through a GET parameter.
Of course you cannot just put a PHP object like the coffee bean into a URL. That’s why the view helper will render an address like the following:
http://quickstart/acme.demo/coffeebean/show?
    coffeeBean%5B__identity%5D=910c2440-ea61-49a2-a68c-ee108a6ee429
Instead of the real PHP object, its Universally Unique Identifier (UUID) was included as a GET parameter.
Note
That certainly is not a beautiful URL for a coffee bean – but you’ll learn how to create nice ones in the main manual.
Before the showAction method is actually called, Flow will analyze the GET and POST
parameters of the incoming HTTP request and convert identifiers into real objects
again. By its UUID the coffee bean is retrieved from the CoffeeBeanRepository and
eventually passed to the action method:
public function showAction(CoffeeBean $coffeeBean): void
newAction
The newAction contains no PHP code – all it does is displaying the corresponding
Fluid template which renders a form.
createAction
The createAction is called when a form displayed by the newAction is submitted.
Like the showAction it expects a CoffeeBean as its argument:
public function createAction(CoffeeBean $newCoffeeBean): void
{
    $this->coffeeBeanRepository->add($newCoffeeBean);
    $this->addFlashMessage('Created a new coffee bean.');
    $this->redirect('index');
}
This time the argument contains not an existing coffee bean but a new one. Flow knows
that the expected type is CoffeeBean (by the type hint in the method and the param annotation)
and thus tries to convert the POST data sent by the form into a new CoffeeBean object.
All you need to do is adding it to the Coffee Bean Repository.
editAction
The purpose of the editAction is to render a form pretty much like that one shown by
the newAction. But instead of empty fields, this form contains all the data from an
existing coffee bean, including a hidden field with the coffee bean’s UUID.
The edit template uses Fluid’s form view helper for rendering the form. The important bit for the edit form is the form object assignment:
<f:form action="update" object="{coffeeBean}" objectName="coffeeBean">
    ...
</f:form>
The object="{coffeeBean}" attribute assignment tells the view helper to use the
coffeeBean template variable as its subject. The individual form elements, such
as the text box, can now refer to the coffee bean object properties:
<f:form.textfield property="name" id="name" />
On submitting the form, the user will be redirected to the updateAction.
updateAction
The updateAction receives the modified coffee bean through its $coffeeBean
argument:
public function updateAction(CoffeeBean $coffeeBean): void
{
    $this->coffeeBeanRepository->update($coffeeBean);
    $this->addFlashMessage('Updated the coffee bean.');
    $this->redirect('index');
}
Although this method looks quite similar to the createAction, there is an important
difference you should be aware of: The parameter passed to the updateAction
is an already existing (that is, already persisted) coffee bean object with the
modifications submitted by the user already applied.
Any modifications to the CoffeBean object will be lost at the end of the request
unless you tell Flow explicitly to apply the changes:
$this->coffeeBeanRepository->update($coffeeBean);
This allows for a very efficient dirty checking and is a safety measure - as it leaves control over the changes in your hands.
Speaking about safety measures: it’s important to know that Flow supports the notion of “safe request methods”. According to the HTTP 1.1 specification, GET and HEAD requests should not modify data on the sever side. Since we consider this a good principle, Flow will not persist any changes automatically if the request method is “safe”. So … don’t use regular links for deleting your coffee beans - send a POST or DELETE request instead.
Next Steps
Congratulations! You already learned the most important concepts of Flow development.
Certainly this tutorial will have raised more questions than it answered. Some of these concepts – and many more you will learn – take some time to get used to. The best advice I can give you is to expect things to be rather simple and not look out for the complicated solution (you know, the not to see the wood for the trees thing …).
Next you should experiment a bit with Flow on your own. After you’ve collected even more questions, I suggest reading the Getting Started Tutorial.
At the time of this writing, The Definitive Guide is not yet complete and still contains a few rough parts. Also the Getting Started Tutorial needs some love and restructuring. Still, it already may be a valuable source for further information and I recommend reading it.
Get in touch with the growing Flow community and make sure to share your ideas about how we can improve Flow and its documentation:
I am sure that, if you’re a passionate developer, you will love Flow – because it was made with you, the developer, in mind.
Happy Flow Experience!
Robert on behalf of the Neos team